jQuery鼠标滑过hover图片开门效果
来源:htmleaf
阅读:15
时间:2018-02-04 01:24
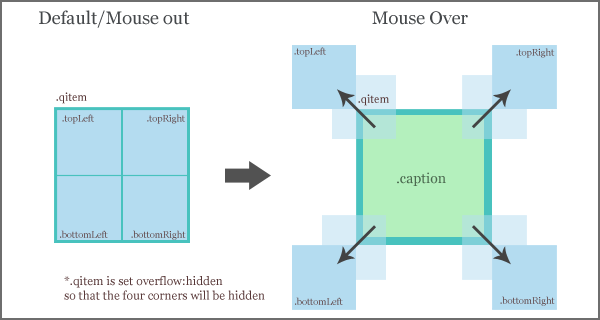
这是一款jQuery图片鼠标滑过开门效果插件,来看看它是如何工作的:
- 将所有的图片层的div的class都设置为
qitem,以便能用jQuery找到图片并替换为4个角的div。 - 每一个角的div都具有相同的背景图像,但是它们的background position各不相同,分别是:top left,top right,bottom left和bottom right。它看起来像是一整幅图片,实际是图片被分成4块,合并在一起。
- 鼠标滑过的移入、移出操作将使4个角向4个方向运动。
- 当4个角图片移动后,图片的标题将显示在出来。
- 如果以后点击了某张图片,那么将链接到哪张图片的div中包含的超链接上去。
从下图可以看到它的工作流程

HTML
html代码设计额原则就是要足够简单实用。下面的html代码是一张图片的代码,可以通过它复制出多张图片。
<a href="http://www.htmleaf.com"><img src="1.gif" alt="Test 1" title="" width="126" height="126"/></a>
 <span class="caption"><h4>Night Club</h4><p>Lorem ipsum dolor sit amet, consectetuer adipiscing elit.</p></span>
</div>
CSS
body {
 font-family:arial;
}
.qitem {
 /* width and height must be even number */
 width:126px;
 height:126px;
 /* some styling for the item */
 border:4px solid #222;
 margin:5px 5px 5px 0;
 background: url('bg.gif') no-repeat;
 /* make sure the four divs are hidden after changing the position */
 overflow:hidden;
 /* absolute position enabled for children elements*/
 position:relative;
 /* display item in single row */
 float:left;
 /* hand symbol for ie and other browser */
 cursor:hand; cursor:pointer;
}
.qitem img {
  border:0;
}
/* styling for caption, position absolute is a must to set the z-index */
.qitem .caption {
  position:absolute;
  z-index:0;
  color:#ccc;
  display:block;
}
.qitem .caption h4 {
   font-size:12px;
   padding:10px 5px 0 8px;
   margin:0;
   color:#369ead;
}
.qitem .caption p {
 font-size:10px;
 padding:3px 5px 0 8px;
 margin:0;
}
/* Generic setting for corners */
.topLeft, .topRight, .bottomLeft, .bottomRight {
 /* allow javascript to move the corners */
 position:absolute;
 background-repeat: no-repeat;
 z-index:200;
}
/* set the background position for different corners */
.topLeft {
 background-position: top left;
}
.topRight {
 background-position: top right;
}
.bottomLeft {
 background-position: bottom left;
}
.bottomRight {
 background-position: bottom right;
}
.clear {
 clear:both;
}
JAVASCRIPT
如何工作
- 当文档就绪时,计算出所有角部块的值。
- 使用
each()来循环每一个图片项,在循环中:- 获取图片url和超链接及其他图片信息。
- 删除
img元素。 - 添加4个角部div。
- 为所有角部div添加背景图片。
- 为所有角部div设置position。
- 为所有角部div设置position。
- 鼠标移入事件:为角部div设置正确的值来移动它们。
- 鼠标移出事件:重置所有的角部div的值,使它们回到原来的位置。
- 鼠标点击事件:连接到指定的url上。
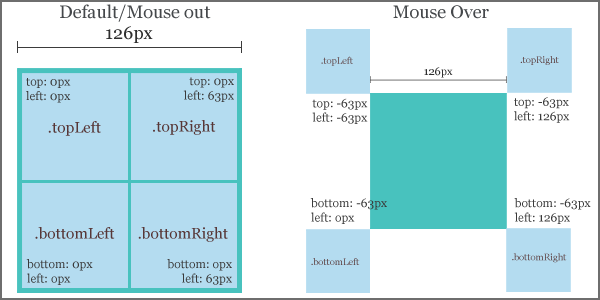
从下图展示位脚部div的position

仔细观察上面的图片,假设一个item的宽为126px,那么我们需要生成的值分别为:0px, 63px, -63px 和 126px。
因此(在这个demo中使用的item值就是126像素)
- var neg = Math.round($('.qitem').width() / 2) * (-1);
- (126 / 2) * (-1), neg = -63px
- var pos = neg * (-1);
- neg = -63px, pos = (-63) * -(1), pos = 63px
- var out = pos * 2;
- pos = 63px, pos = 63 * 2, pos = 126px
$(document).ready(function() {
 //Custom settings
 var style_in = 'easeOutBounce';
 var style_out = 'jswing';
 var speed_in = 1000;
 var speed_out = 300;
 //Calculation for corners
 var neg = Math.round($('.qitem').width() / 2) * (-1);
 var pos = neg * (-1);
 var out = pos * 2;
 $('.qitem').each(function () {
  //grab the anchor and image path
  url = $(this).find('a').attr('href');
  img = $(this).find('img').attr('src');
  //remove the image
  $('img', this).remove();
  //append four corners/divs into it
  $(this).append('<div class="topLeft"></div><div class="topRight"></div><div class="bottomLeft"></div><div class="bottomRight"></div>');
  //set the background image to all the corners
  $(this).children('div').css('background-image','url('+ img + ')');
  //set the position of corners
  $(this).find('div.topLeft').css({top:0, left:0, width:pos , height:pos});
  $(this).find('div.topRight').css({top:0, left:pos, width:pos , height:pos});
  $(this).find('div.bottomLeft').css({bottom:0, left:0, width:pos , height:pos});
  $(this).find('div.bottomRight').css({bottom:0, left:pos, width:pos , height:pos});
 }).hover(function () {
  //animate the position
  $(this).find('div.topLeft').stop(false, true).animate({top:neg, left:neg}, {duration:speed_out, easing:style_out});
  $(this).find('div.topRight').stop(false, true).animate({top:neg, left:out}, {duration:speed_out, easing:style_out});
  $(this).find('div.bottomLeft').stop(false, true).animate({bottom:neg, left:neg}, {duration:speed_out, easing:style_out});
  $(this).find('div.bottomRight').stop(false, true).animate({bottom:neg, left:out}, {duration:speed_out, easing:style_out});
 },
 function () {
  //put corners back to the original position
  $(this).find('div.topLeft').stop(false, true).animate({top:0, left:0}, {duration:speed_in, easing:style_in});
  $(this).find('div.topRight').stop(false, true).animate({top:0, left:pos}, {duration:speed_in, easing:style_in});
  $(this).find('div.bottomLeft').stop(false, true).animate({bottom:0, left:0}, {duration:speed_in, easing:style_in});
  $(this).find('div.bottomRight').stop(false, true).animate({bottom:0, left:pos}, {duration:speed_in, easing:style_in});
 }).click (function () {
  //go to the url
  [removed] = $(this).find('a').attr('href');
 });
});

版权所有 爱编程 © Copyright 2012. All Rights Reserved.
闽ICP备12017094号-3
闽ICP备12017094号-3
