基于HTML5 Canvas生成粒子效果的人物头像
阅读:5546
时间:2018-02-01 03:26
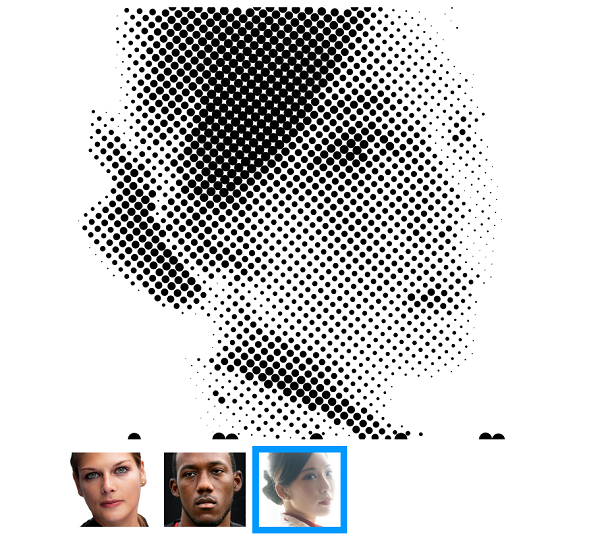
前面我们分享过一个HTML5 Canvas实现的图像马赛克模糊效果,HTML5处理图片真的非常简单。今天我们要再利用HTML5 Canvas实现一个粒子效果的人物头像,你可以任意选择一张头像图片,接下来该图片会被打散成许多粒子,然后慢慢的重组成图片,鼠标滑过图片时粒子还会出现浮动的动画特效,看上去非常酷。
HTML代码如下
<p class="center">Change pixel resolution <input type="range" min="4" max="100" value="32" id="range" /> <span id="output">32</span></p>
<div class="thumb">
	     <img src="img/1.jpg" id="dolly1" />
     	<img src="img/2.jpg" id="dolly2" />
     	<img src="img/3.jpg" id="dolly3" />
</div>
定义了一个滑竿和3张待模糊的图片。 JavaScript代码如下
/*!
 * Close Pixelate v2.0.00 beta
 * http://desandro.com/resources/close-pixelate/
 *
 * Developed by
 * - David DeSandro  http://desandro.com
 * - John Schulz  http://twitter.com/jfsiii
 *
 * Licensed under MIT license
 */

/*jshint asi: true, browser: true, eqeqeq: true, forin: false, immed: false, newcap: true, noempty: true, strict: true, undef: true */

( function( window, undefined ) {

//
'use strict';

// util vars
var TWO_PI = Math.PI * 2
var QUARTER_PI = Math.PI * 0.25

// utility functions
function isArray( obj ) {
  return Object.prototype.toString.call( obj ) === "[object Array]"
}

function isObject( obj ) {
  return Object.prototype.toString.call( obj ) === "[object Object]"
}

var console = window.console

// check for canvas support
var canvas = document.createElement('canvas')
var isCanvasSupported = canvas.getContext && canvas.getContext('2d')

// don't proceed if canvas is no supported
if ( !isCanvasSupported ) {
  return
}

function ClosePixelation( img, options ) {
  this.img = img
  // creat canvas
  var canvas = this.canvas = document.createElement('canvas')
  this.ctx = canvas.getContext('2d')
  // copy attributes from img to canvas
  canvas.className = img.className
  canvas.id = img.id

  this.render( options )

  // replace image with canvas
  img.parentNode.replaceChild( canvas, img )

}

ClosePixelation.prototype.render = function( options ) {
  this.options = options
  // set size
  var w = this.width = this.canvas.width = this.img.width
  var h = this.height = this.canvas.height = this.img.height
  // draw image on canvas
  this.ctx.drawImage( this.img, 0, 0 )
  // get imageData

  try {
    this.imgData = this.ctx.getImageData( 0, 0, w, h ).data
  } catch ( error ) {
    if ( console ) {
      console.error( error )
    }
    return
  }

  this.ctx.clearRect( 0, 0, w, h )

  for ( var i=0, len = options.length; i < len; i++ ) {
    this.renderClosePixels( options[i] )
  }

}

ClosePixelation.prototype.renderClosePixels = function( opts ) {
  var w = this.width
  var h = this.height
  var ctx = this.ctx
  var imgData = this.imgData

  // option defaults
  var res = opts.resolution || 16
  var size = opts.size || res
  var alpha = opts.alpha || 1
  var offset = opts.offset || 0
  var offsetX = 0
  var offsetY = 0
  var cols = w / res + 1
  var rows = h / res + 1
  var halfSize = size / 2
  var diamondSize = size / Math.SQRT2
  var halfDiamondSize = diamondSize / 2

  if ( isObject( offset ) ){
    offsetX = offset.x || 0
    offsetY = offset.y || 0
  } else if ( isArray( offset) ){
    offsetX = offset[0] || 0
    offsetY = offset[1] || 0
  } else {
    offsetX = offsetY = offset
  }

  var row, col, x, y, pixelY, pixelX, pixelIndex, red, green, blue, pixelAlpha

  for ( row = 0; row < rows; row++ ) {
    y = ( row - 0.5 ) * res + offsetY
    // normalize y so shapes around edges get color
    pixelY = Math.max( Math.min( y, h-1), 0)

    for ( col = 0; col < cols; col++ ) {
      x = ( col - 0.5 ) * res + offsetX
      // normalize y so shapes around edges get color
      pixelX = Math.max( Math.min( x, w-1), 0)
      pixelIndex = ( pixelX + pixelY * w ) * 4
      red   = imgData[ pixelIndex + 0 ]
      green = imgData[ pixelIndex + 1 ]
      blue  = imgData[ pixelIndex + 2 ]
      pixelAlpha = alpha * ( imgData[ pixelIndex + 3 ] / 255)

      ctx.fillStyle = 'rgba(' + red +','+ green +','+ blue +','+ pixelAlpha + ')'

      switch ( opts.shape ) {
        case 'circle' :
          ctx.beginPath()
            ctx.arc ( x, y, halfSize, 0, TWO_PI, true )
            ctx.fill()
          ctx.closePath()
          break
        case 'diamond' :
          ctx.save()
            ctx.translate( x, y )
            ctx.rotate( QUARTER_PI )
            ctx.fillRect( -halfDiamondSize, -halfDiamondSize, diamondSize, diamondSize )
          ctx.restore()
          break
        default :
          // square
          ctx.fillRect( x - halfSize, y - halfSize, size, size )
      } // switch
    } // col
  } // row

}

// enable img.closePixelate
HTMLImageElement.prototype.closePixelate = function ( options ) {
  return new ClosePixelation( this, options )
}

// put in global namespace
window.ClosePixelation = ClosePixelation

})( window );
以上这个JS文件是马赛克模糊效果的具体实现。 下面是页面上调用的JS代码:
var dolly1 = document.getElementById('dolly1')
	  var dolly2 = document.getElementById('dolly2')
	  var dolly3 = document.getElementById('dolly3')
	  var pixelOpts = [ { resolution: 8 } ]
	  var pixelDolly1 = dolly1.closePixelate( pixelOpts )
	  var pixelDolly2 = dolly2.closePixelate( pixelOpts )
	  var pixelDolly3 = dolly3.closePixelate( pixelOpts )
	  var range = document.getElementById('range')
	  var output = document.getElementById('output')

	  range.addEventListener( 'change', function( event ) {
	    var res = parseInt( event.target.value, 10 )
	    res = Math.floor( res / 2 ) * 2
	    res = Math.max( 4, Math.min( 100, res ) )
	    output.textContent = res
	    // console.log( res );
	    pixelOpts = [ { resolution: res } ]
	    pixelDolly1.render( pixelOpts )
	    pixelDolly2.render( pixelOpts )
	    pixelDolly3.render( pixelOpts )
	  }, false )
以上就是实现这款HTML5 Canvas图片马赛克模糊动画的全部过程。
via:http://www.w2bc.com/Article/21456


版权所有 爱编程 © Copyright 2012. All Rights Reserved.
闽ICP备12017094号-3
闽ICP备12017094号-3